This post is to demonstrate upgrade Oracle Database from 11g (11.2.0.4) to 19c (19.3) by DBUA (Non CDB).
1. Take the RMAN full backup of 11g DB.
2. Take the 11g ORACLE Home backup.
3. Check the hidden parameters in 11g DB.
19c DBUA restricts the carry over of hidden parameters since Oracle recommends not to have hidden parameters other than those suggested by Oracle Support during the upgrade.
SQL> SELECT name, description from SYS.V$PARAMETER WHERE name LIKE ‘\_%’ ESCAPE ‘\’;
no rows selected
4. Ensure DB backup is completed before upgrade.
SQL> SELECT * FROM v$backup WHERE status != ‘NOT ACTIVE’;
no rows selected
5. Check the invalid objects and make them valid. Also, SYS and SYSTEM objects should not be in invalid state.
SQL> select count(*) from dba_objects where status=’INVALID’;
COUNT(*)
———-
0
6. Check the status of dba registry components before upgrade. All components should be in valid status.
set lines 1234 pages 1234
col comp_name for a50
col version for a15
col status for a10
SELECT comp_name, version, status FROM dba_registry;
COMP_NAME VERSION STATUS
————————————————– ————— ———-
OWB 11.2.0.4.0 VALID
Oracle Application Express 3.2.1.00.12 VALID
Oracle Enterprise Manager 11.2.0.4.0 VALID
OLAP Catalog 11.2.0.4.0 VALID
Spatial 11.2.0.4.0 VALID
Oracle Multimedia 11.2.0.4.0 VALID
Oracle XML Database 11.2.0.4.0 VALID
Oracle Text 11.2.0.4.0 VALID
Oracle Expression Filter 11.2.0.4.0 VALID
Oracle Rules Manager 11.2.0.4.0 VALID
Oracle Workspace Manager 11.2.0.4.0 VALID
Oracle Database Catalog Views 11.2.0.4.0 VALID
Oracle Database Packages and Types 11.2.0.4.0 VALID
JServer JAVA Virtual Machine 11.2.0.4.0 VALID
Oracle XDK 11.2.0.4.0 VALID
Oracle Database Java Packages 11.2.0.4.0 VALID
OLAP Analytic Workspace 11.2.0.4.0 VALID
Oracle OLAP API 11.2.0.4.0 VALID
18 rows selected.
—
set lines 1234 pages 1234
col action_time for a30
col action for a14
col namespace for a14
col version for a10
col comments for a60
col bundle_series for a14
select action_time, action, namespace, version, comments from dba_registry_history;
ACTION_TIME ACTION NAMESPACE VERSION COMMENTS
—————————— ————– ————– ———- ———————–
24-08-13 12:03:45.119862 PM APPLY SERVER 11.2.0.4 Patchset 11.2.0.2.0
02-07-25 02:07:15.468709 PM APPLY SERVER 11.2.0.4 Patchset 11.2.0.2.0
7. Take the compatible parameter value of 11g DB.
Min value of COMPATIBLE parameter to upgrade 19.1 is “11.2.0”, make sure you have COMPATIBLE parameter is set to 11.2.0 or greater.
SQL> show parameter compatible
NAME TYPE VALUE
———————————— ———– —————
compatible string 11.2.0.4.0
8. Take the time zone value of 11g DB.
Time zone should less than or equal to target database time zone version.
set linesize 300
col property_name for a30
col value for a20
SELECT PROPERTY_NAME, SUBSTR(property_value, 1, 30) value
FROM DATABASE_PROPERTIES
WHERE PROPERTY_NAME LIKE ‘DST_%’
ORDER BY PROPERTY_NAME;
PROPERTY_NAME VALUE
—————————— ——————–
DST_PRIMARY_TT_VERSION 14
DST_SECONDARY_TT_VERSION 0
DST_UPGRADE_STATE NONE
—
SQL> col version for 999999999999999
select * from v$timezone_file;
FILENAME VERSION
——————– —————-
timezlrg_14.dat 14
8. Find the duplicate objects in the SYS and SYSTEM schema.
Ensure that you do not have duplicate objects in the SYS and SYSTEM schema.
Download dbupgdiag.sql from Doc Id 556610.1 to collect DB Upgrade/Migrate Diagnostic Information
9. Upgrade the APEX.
If APEX is installed in 11g DB, it is recommended to upgrade APEX before upgrading DB.
10. Disable the Custom Triggers.
Disable any custom triggers that would get executed before or after DDL statements. Re-enable after the upgrade.
11. Enable archive mode and Fast Recovery Area (FRA).
SQL> select flashback_on from v$database;
FLASHBACK_ON
——————
NO
SQL> show parameter recovery
NAME TYPE VALUE
———————————— ———–
db_recovery_file_dest string
db_recovery_file_dest_size big integer 0
recovery_parallelism integer 0
SQL> alter system set db_recovery_file_dest_size=20G;
System altered.
SQL> alter system set db_recovery_file_dest=’/oem/fra’ scope=both;
System altered.
SQL> show parameter recovery
NAME TYPE VALUE
———————————— ———–
db_recovery_file_dest string /oem/fra
db_recovery_file_dest_size big integer 20G
recovery_parallelism integer 0
Note:= Ensure the log_archive_dest_1 must have sufficient space, at least 4535 MB for archive logs generation.
—
SQL> select name,open_mode,log_mode from v$database;
NAME OPEN_MODE LOG_MODE
———- ———- ————
PROD READ WRITE NOARCHIVELOG
SQL> shutdown immediate;
Database closed.
Database dismounted.
ORACLE instance shut down.
SQL> startup mount;
ORACLE instance started.
Total System Global Area 3323752448 bytes
Fixed Size 2257800 bytes
Variable Size 788532344 bytes
Database Buffers 2516582400 bytes
Redo Buffers 16379904 bytes
Database mounted.
SQL> alter database archivelog;
Database altered.
SQL> alter database open;
Database altered.
SQL> select name,open_mode,log_mode from v$database;
NAME OPEN_MODE LOG_MODE
———- ———- ————
PROD READ WRITE ARCHIVELOG
12. Check the status of all materialized views (MV), and refresh any materialized views that are not fresh.
Use this procedure to query the system to determine if there are any materialized view refreshes still in progress.
SQL> SELECT o.name FROM sys.obj$ o, sys.user$ u, sys.sum$ s WHERE o.type# = 42 AND bitand(s.mflags, 8) =8;
no rows selected
Use below SQL to check COMPILATION_ERROR.
SQL> select owner, mview_name, staleness, compile_state from dba_mviews;
OWNER MVIEW_NAME STALENESS COMPILE_STATE
—————————— —————————— ——————- ———–
SYSMAN MGMT_ECM_MD_ALL_TBL_COLUMNS FRESH VALID
SH CAL_MONTH_SALES_MV UNKNOWN VALID
SH FWEEK_PSCAT_SALES_MV UNKNOWN VALID
SQL> EXECUTE DBMS_MVIEW.REFRESH(‘SH.CAL_MONTH_SALES_MV’, method => ‘C’);
PL/SQL procedure successfully completed.
SQL> EXECUTE DBMS_MVIEW.REFRESH(‘SH.FWEEK_PSCAT_SALES_MV’, method => ‘C’);
PL/SQL procedure successfully completed.
SQL> select owner, mview_name, staleness, compile_state from dba_mviews;
OWNER MVIEW_NAME STALENESS COMPILE_STATE
—————————— —————————— ——————- ———–
SYSMAN MGMT_ECM_MD_ALL_TBL_COLUMNS FRESH VALID
SH FWEEK_PSCAT_SALES_MV FRESH VALID
SH CAL_MONTH_SALES_MV FRESH VALID
13. Disable scheduled database custom jobs and cron jobs.
14. check the definition of the PUBLIC synonym AREA.
Before the upgrade, if Oracle Multimedia and/or Oracle Spatial is installed, check the definition of the PUBLICsynonym AREA. It should be defined to be a synonym for OGC_AREA, otherwise, it causes invalid db components uponaupgrading.
SQL> set linesize 300
SQL> select owner, synonym_name, table_owner, table_name from dba_synonyms where synonym_name =’AREA’;
OWNER SYNONYM_NAME TABLE_OWNER TABLE_NAME
—————————— —————————— —————————— ——————————
PUBLIC AREA MDSYS OGC_AREA
15. Gather dictionary statistics before upgrade.
SQL> EXEC DBMS_STATS.GATHER_DICTIONARY_STATS;
PL/SQL procedure successfully completed.
16. Purge the Recycle bin before upgrade.
We can purge the recycle bin via DBUA.
SQL> PURGE DBA_RECYCLEBIN;
DBA Recyclebin purged.
17. Increase the processes parameter value to 300, if it is lower than 300.
SQL> show parameter processes;
NAME TYPE VALUE
———————————— ———– ——————————
aq_tm_processes integer 1
db_writer_processes integer 1
gcs_server_processes integer 0
global_txn_processes integer 1
job_queue_processes integer 1000
log_archive_max_processes integer 4
processes integer 150
SQL> alter system set processes=300 scope=spfile;
System altered.
SQL> shut immediate
Database closed.
Database dismounted.
ORACLE instance shut down.
SQL> startup
ORACLE instance started.
Total System Global Area 3607691264 bytes
Fixed Size 2258480 bytes
Variable Size 838863312 bytes
Database Buffers 2751463424 bytes
Redo Buffers 15106048 bytes
Database mounted.
Database opened.
SQL> show parameter processes;
NAME TYPE VALUE
———————————— ———– ——————————
aq_tm_processes integer 1
db_writer_processes integer 1
gcs_server_processes integer 0
global_txn_processes integer 1
job_queue_processes integer 1000
log_archive_max_processes integer 4
processes integer 300
18. If any ACLs existed, need to take the backup.
set linesize 300
col acl for a60
col host for a14
SELECT acl, host, lower_port, upper_port FROM DBA_NETWORK_ACLS;
no rows selected
—
set linesize 300
col acl for a60
col principal for a20
col privilege for a16
SELECT acl, principal, privilege, is_grant FROM DBA_NETWORK_ACL_PRIVILEGES;
no rows selected
Refer Oracle Support Doc ID 1634275.1 for the script to take the backup of ACL in Oracle 11g.
19. If 11g database Oracle Label Security and Oracle Database Vault, perform below steps.
To run the OLS preprocess script on a release 11.2 database before upgrading:
19.a. Copy the following scripts from the 19c Oracle home (19c) to the 11g Oracle home
ORACLE_HOME/rdbms/admin/olspreupgrade.sql
ORACLE_HOME/rdbms/admin/emremove.sql
ORACLE_HOME/olap/admin/catnoamd.sql
19.b. In 11g DB, connect as DVOWNER to the database.
19.c. Run the following statement:
SQL> GRANT DV_PATCH_ADMIN to SYS;
19.d. Now, connect SYS as SYSDBA
CONNECT SYS AS SYSDBA
19.e. Run the below preprocess scripts for Data Vault
ORACLE_HOME/rdbms/admin/olspreupgrade.sql
ORACLE_HOME/rdbms/admin/emremove.sql
ORACLE_HOME/olap/admin/catnoamd.sql
You may continue to run your applications on the database while the preprocess scripts are
19.f. After the olspreupgrade.sql completes its run successfully, connect to the 11g database as DVOWNER.
19.g. Run the following SQL statement:
SQL> REVOKE DV_PATCH_ADMIN from SYS;
20. Removing DB Control with emremove.sql (For Oracle Database releases earlier than 12.1) and removing OLAP Catalog in 11 DB.
Warning: The below step should not be executed during the upgrade of Enterprise Manager Cloud Control Repository database andlead the EM Cloud Control Repository DB to unusable.
Stop DB Console:
emctl stop dbconsole
Execute emremove.sql script. The script will be located in target 19c $ORACLE_HOME/rdbms/admin/
copy the script from 19c $ORACLE_HOME/rdbms/admin/ to 11g $ORACLE_HOME/rdbms/admin/
cp /u01/app/oracle/product/19.0.0/db_1/rdbms/admin/emremove.sql /u01/app/oracle/product/11.0.0/db_1/rdbms/admin
SQL>SET ECHO ON
SQL>SET SERVEROUTPUT ON
SQL>@/u01/app/oracle/product/11.0.0/db_1/rdbms/admin/emremove.sql
After execution and completion of emremove.sql completes, we must manually remove below directories from file system.
$ORACLE_HOME/HOSTNAME_SID
$ORACLE_HOME/oc4j/j2ee/OC4J_DBConsole_HOSTNAME_SID directories from your file system.
—
Starting with Oracle Database 12c, the OLAP Catalog (OLAP AMD) is desupported and will be automatically marked as OPTION OFF during the database upgrade if present. Oracle recommends removing OLAP Catalog (OLAP AMD) before database upgrade. This step can be manually performed before the upgrade to reduce downtime.
Remove OLAP Catalog by running the 11.2.0.4.0 SQL script
$ORACLE_HOME/olap/admin/catnoamd.sql
21. Check the below tablespaces size and add necessary space to the tablespaces.
Tablespace Size For Upgrade
———- ———- ———–
SYSAUX 580 MB 779 MB
SYSTEM 1060 MB 1484 MB
TEMP 36 MB 150 MB
col tablespace_name for a14
col file_name for a50
select tablespace_name, file_name, bytes/1024/1024/1024 as GB from dba_data_files where tablespace_name=’SYSAUX’;
TABLESPACE_NAM FILE_NAME GB
————– ————————————————– ———-
SYSAUX /u01/app/oracle/oradata/prod/sysaux01.dbf .56640625
SQL> alter database datafile ‘/u01/app/oracle/oradata/prod/sysaux01.dbf’ resize 1G;
Database altered.
—
SQL> select tablespace_name, file_name, bytes/1024/1024/1024 as GB from dba_data_files where tablespace_name=’SYSTEM’;
TABLESPACE_NAM FILE_NAME GB
————– ————————————————– ———-
SYSTEM /u01/app/oracle/oradata/prod/system01.dbf 1.03515625
SQL> alter database datafile ‘/u01/app/oracle/oradata/prod/system01.dbf’ resize 2G;
Database altered.
—
SQL> select sum(bytes)/1024/1024/1024 gb from dba_temp_files where tablespace_name = ‘TEMP’;
GB
———-
.03515625
SQL> select name from v$tempfile;
NAME
——————————————–
/u01/app/oracle/oradata/prod/temp01.dbf
SQL> alter database tempfile ‘/u01/app/oracle/oradata/prod/temp01.dbf’ resize 1G;
Database altered.
SQL> select sum(bytes)/1024/1024/1024 gb from dba_temp_files where tablespace_name = ‘TEMP’;
GB
———-
1
select sum(bytes)/1024/1024/1024 gb from dba_temp_files where tablespace_name = ‘UNDOTBS1’;
select tablespace_name, file_name, bytes/1024/1024/1024 as GB from dba_data_files where tablespace_name=’UNDOTBS1′;
alter database datafile ‘/u01/app/oracle/oradata/prod/undotbs01.dbf’ resize 1G;
22. Copying Transparent Encryption Oracle Wallets from 11g to 19c home.
If Oracle wallet with Transparent Data Encryption (TDE) implemented in TDE, and using Database Upgrade Assistant (DBUA) to upgrade the database, then copy the sqlnet.ora and wallet file to the 19c Oracle home.
You must copy the sqlnet.ora and the wallet file manually before starting the upgrade.
1. Log in as an authorized user.
2. Manually copy the sqlnet.ora file, and the wallet file, ewallet.p12, to the 19c Oracle home.
3. Open the Oracle wallet in mount.
For example:
SQL> STARTUP MOUNT;
SQL> ALTER SYSTEM SET ENCRYPTION WALLET OPEN;
23. Check the user accounts use Case-Insensitive password version.
If there are any 10g versions, suggest to fix 10g versions, failing to do so, user accounts will LOCKED after upgrade.
SQL> select USERNAME, PASSWORD_VERSIONS from DBA_USERS where PASSWORD_VERSIONS like ‘%10G%’ and USERNAME <> ‘ANONYMOUS’;
USERNAME PASSWORD
—————————— ——–
SYS 10G 11G
SYSTEM 10G 11G
FLOWS_FILES 10G 11G
MDSYS 10G 11G
ORDSYS 10G 11G
EXFSYS 10G 11G
DBSNMP 10G 11G
SCOTT 10G 11G
WMSYS 10G 11G
ORACLE_OCM 10G 11G
APPQOSSYS 10G 11G
APEX_030200 10G 11G
OWBSYS_AUDIT 10G 11G
BI 10G 11G
PM 10G 11G
MDDATA 10G 11G
IX 10G 11G
ORDDATA 10G 11G
CTXSYS 10G 11G
SH 10G 11G
OUTLN 10G 11G
DIP 10G 11G
OE 10G 11G
APEX_PUBLIC_USER 10G 11G
HR 10G 11G
XDB 10G 11G
SPATIAL_CSW_ADMIN_USR 10G 11G
SPATIAL_WFS_ADMIN_USR 10G 11G
ORDPLUGINS 10G 11G
OWBSYS 10G 11G
SI_INFORMTN_SCHEMA 10G 11G
OLAPSYS 10G 11G
32 rows selected.
Refer below Oracle documentation to fix the 10G versions password issue.
https://docs.oracle.com/en/database/oracle/oracle-database/19/upgrd/recommended-and-best-practices-complete-upgrading-oracle-database.html#GUID-D7B09DFE-F55D-449A-8F8A-174D89936304
Note: Ensure that we do not have the deprecated parameter SEC_CASE_SENSITIVE_LOGON set to FALSE.
24. Check the RMAN catalog version, need to upgrade RMAN catalog after database upgrade.
For more information, refer Oracle Support Doc – RMAN Compatibility Matrix (Doc ID 73431.1)
25. Download the latest Preupgrade.jar and then run the Preupgrade utility.
Download the Preupgrade.jar from Doc ID 884522.1 and replace with the old one of 19c.
cd /u01/app/oracle/product/19.0.0/db_1/rdbms/admin
mv preupgrade_package.sql preupgrade_package.sql_old
mv preupgrade_messages.properties preupgrade_messages.properties_old
mv preupgrade.jar preupgrade.jar_old
unzip preupgrade_19_cbuild_13_lf.zip
——–
Now, set the environment to 11g home and run the preupgrade utility.
export ORACLE_SID=prod
export ORACLE_HOME=/u01/app/oracle/product/11.0.0/db_1
export PATH=/u01/app/oracle/product/11.0.0/db_1/bin
[oracle@prod ~]$ /u01/app/oracle/product/11.0.0/db_1/jdk/bin/java -jar /u01/app/oracle/product/19.0.0/db_1/rdbms/admin/preupgrade.jar TERMINAL FILE DIR /u01/app/oracle/cfgtoollogs/preupgrade
==================
PREUPGRADE SUMMARY
==================
/u01/app/oracle/cfgtoollogs/preupgrade/preupgrade.log
/u01/app/oracle/cfgtoollogs/preupgrade/preupgrade_fixups.sql
/u01/app/oracle/cfgtoollogs/preupgrade/postupgrade_fixups.sql
Execute fixup scripts as indicated below:
Before upgrade:
Log into the database and execute the preupgrade fixups
@/u01/app/oracle/cfgtoollogs/preupgrade/preupgrade_fixups.sql
After the upgrade:
Log into the database and execute the postupgrade fixups
@/u01/app/oracle/cfgtoollogs/preupgrade/postupgrade_fixups.sql
Preupgrade complete: 2025-06-29T21:24:13
——–
Now, run the preupgrade_fixups.sql in 11g DB.
SQL> @/u01/app/oracle/cfgtoollogs/preupgrade/preupgrade_fixups.sql
Executing Oracle PRE-Upgrade Fixup Script
Auto-Generated by: Oracle Preupgrade Script
Version: 19.0.0.0.0 Build: 13
Generated on: 2025-07-02 14:36:43
For Source Database: PROD
Source Database Version: 11.2.0.4.0
For Upgrade to Version: 19.0.0.0.0
Preup Preupgrade
Action Issue Is
Number Preupgrade Check Name Remedied Further DBA Action
—— ———————— ———- ——————————–
1. purge_recyclebin YES None.
2. apex_manual_upgrade NO Manual fixup recommended.
3. component_info NO Informational only.
Further action is optional.
4. exf_rul_exists NO Informational only.
Further action is optional.
5. rman_recovery_version NO Informational only.
Further action is optional.
6. invalid_all_obj_info NO Informational only.
Further action is optional.
The fixup scripts have been run and resolved what they can. However,
there are still issues originally identified by the preupgrade that
have not been remedied and are still present in the database.
Depending on the severity of the specific issue, and the nature of
the issue itself, that could mean that your database is not ready
for upgrade. To resolve the outstanding issues, start by reviewing
the preupgrade_fixups.sql and searching it for the name of
the failed CHECK NAME or Preupgrade Action Number listed above.
There you will find the original corresponding diagnostic message
from the preupgrade which explains in more detail what still needs
to be done.
PL/SQL procedure successfully completed.
—
Ignoring below recommended action as is demo environment.
Preup Preupgrade
Action Issue Is
Number Preupgrade Check Name Remedied Further DBA Action
—— ———————— ———- ——————————–
2. apex_manual_upgrade NO Manual fixup recommended.
26. Upgrade the 11g DB by invoking the DBUA.
Launch the DBUA from 19c home
export ORACLE_HOME=/u01/app/oracle/product/19.0.0/db_1
export PATH=$ORACLE_HOME/bin:$PATH
export ORACLE_SID=prod
dbua
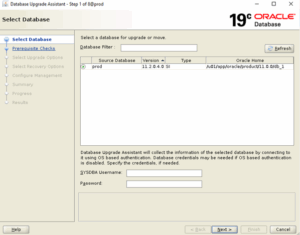
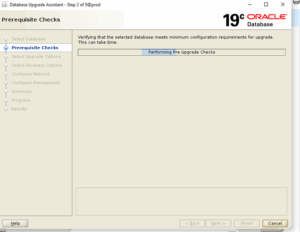
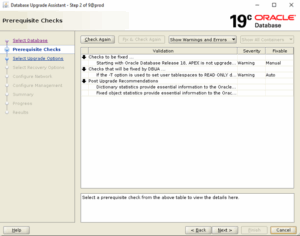

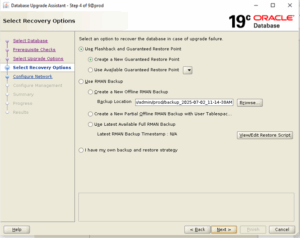
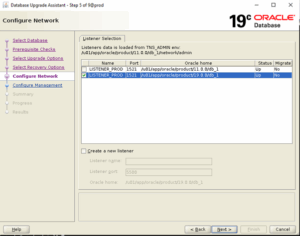
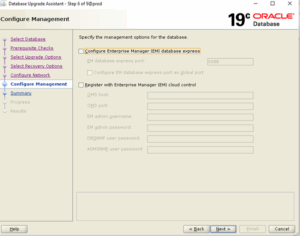
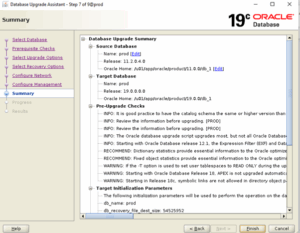
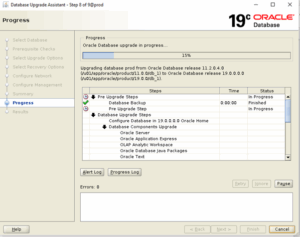
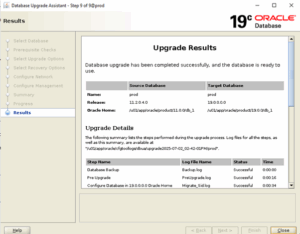
[oracle@prod ~]$ dbua
Logs directory: /u01/app/oracle/cfgtoollogs/dbua/upgrade2025-07-02_02-42-01PM
Database upgrade has been completed successfully, and the database is ready to use.
27. Post upgrade, check the DB version.
[oracle@prod ~]$ export ORACLE_HOME=/u01/app/oracle/product/19.0.0/db_1
[oracle@prod ~]$ export ORACLE_SID=prod
[oracle@prod ~]$ export PATH=/u01/app/oracle/product/19.0.0/db_1/bin
[oracle@prod ~]$ sqlplus -V
SQL*Plus: Release 19.0.0.0.0 – Production
Version 19.3.0.0.0
SQL> select name,version,status from v$database, v$instance;
NAME VERSION STATUS
——— —————– ————
PROD 19.0.0.0.0 OPEN
SQL> select banner_full from v$version;
BANNER_FULL
——————————————————————————–
Oracle Database 19c Enterprise Edition Release 19.0.0.0.0 – Production
Version 19.3.0.0.0
28. Post upgrade, check the invalid objects and make them valid. Also, SYS and SYSTEM objects should not be in invalid state.
SQL> select count(*) from dba_objects where status=’INVALID’;
COUNT(*)
———-
0
29. Post upgrade, check the status of dba registry components before upgrade. All components should be in valid status.
set lines 1234 pages 1234
col comp_name for a50
col version for a15
col status for a10
SELECT comp_name, version, status FROM dba_registry;
COMP_NAME VERSION STATUS
————————————————– ————— ———-
Oracle Database Catalog Views 19.0.0.0.0 VALID
Oracle Database Packages and Types 19.0.0.0.0 VALID
JServer JAVA Virtual Machine 19.0.0.0.0 VALID
Oracle XDK 19.0.0.0.0 VALID
Oracle Database Java Packages 19.0.0.0.0 VALID
OLAP Analytic Workspace 19.0.0.0.0 VALID
Oracle Real Application Clusters 19.0.0.0.0 OPTION OFF
Oracle Workspace Manager 19.0.0.0.0 VALID
Oracle Text 19.0.0.0.0 VALID
Oracle XML Database 19.0.0.0.0 VALID
Oracle Multimedia 19.0.0.0.0 VALID
Spatial 19.0.0.0.0 VALID
Oracle OLAP API 19.0.0.0.0 VALID
Oracle Application Express 3.2.1.00.12 VALID
14 rows selected.
—
set lines 1234 pages 1234
col action_time for a30
col action for a14
col namespace for a14
col version for a10
col comments for a60
col bundle_series for a14
select action_time,action,namespace,version,comments from dba_registry_history;
ACTION_TIME ACTION NAMESPACE VERSION COMMENTS
—————————— ————– ————– ———- ———————
24-08-13 12:03:45.119862 PM APPLY SERVER 11.2.0.4 Patchset 11.2.0.2.0
02-07-25 2:07:15.468709 PM APPLY SERVER 11.2.0.4 Patchset 11.2.0.2.0
BOOTSTRAP DATAPATCH 19 RDBMS_19.3.0.0.0DBRU_LINUX.X64_190417
02-07-25 3:25:55.137723 PM RU_APPLY SERVER 19.0.0.0.0 Patch applied on 19.3.0.0.0: Release_Update – 190410122720
02-07-25 3:27:50.404590 PM UPGRADE SERVER 19.0.0.0.0 Upgraded from 11.2.0.4.0 to 19.3.0.0.0
30. Post upgrade, check the time zone value of 19c DB.
set linesize 300
col property_name for a30
col value for a20
SELECT PROPERTY_NAME, SUBSTR(property_value, 1, 30) value
FROM DATABASE_PROPERTIES
WHERE PROPERTY_NAME LIKE ‘DST_%’
ORDER BY PROPERTY_NAME;
PROPERTY_NAME VALUE
—————————— ——————–
DST_PRIMARY_TT_VERSION 32
DST_SECONDARY_TT_VERSION 0
DST_UPGRADE_STATE NONE
—
col version for 9999999999999
SELECT * FROM v$timezone_file;
FILENAME VERSION CON_ID
——————– ————– ———-
timezlrg_32.dat 32 0
31. Post upgrade, update the compatible parameter value after application testing.
After successful application testing, update the compatible parameter.
SQL> show parameter compatible
Disclaimer:
Please note the above information is only for educational purpose and practised in personal test database only. Always test in test database before implementing in production database. The pre-requisites and ways of implementing may vary from one environment to another. Hence, not providing guarantee that it will work in your environment.
s